Recording Vocals at Home: Room, Mic Distance, Levels and Comping
This guide walks through a full home vocal session, from choosing the spot in the room to building the final comp, with starting settings you can adjust for each singer.
By Delia Marchbanks, in Room & Monitoring
A good vocal recording at home depends less on the microphone than on three things that cost little: where the singer stands, how much of the room reaches the mic, and how comfortable the performer feels in the headphones. Get those right and an ordinary microphone produces a vocal that mixes easily. Get them wrong and no plugin fully removes the boxy room sound or the tired, pitchy performance.
This guide follows the order of a real session: room, microphone setup, headphone mix, levels, the takes themselves and comping.
Choose the spot in the room
Most home rooms are small with parallel hard walls, which means short, strong reflections. When those reflections reach the microphone a few milliseconds after the direct voice, they color it with a hollow, boxy tone that sounds like "bedroom" no matter how you EQ it.
Starting rules for placement:
- Keep the microphone away from walls and corners, ideally at least a meter from the nearest hard surface.
- Avoid the exact middle of the room, where reflections from opposite walls arrive at the same time.
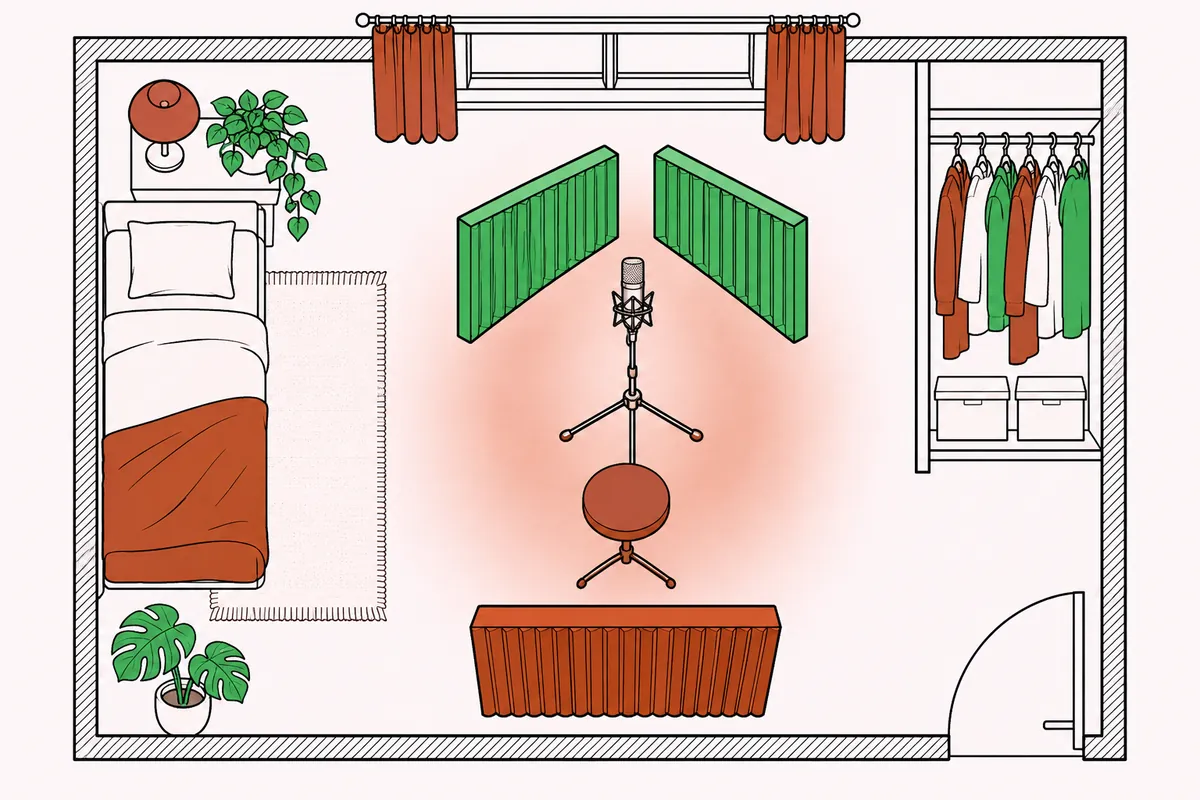
- Place the singer facing into the room with something soft behind them, so the mic (pointing at the singer) looks at that soft area.
- An open closet full of hanging clothes is one of the best absorbers a home has. Singing toward it, with the mic between singer and closet, works well.
A large room is not automatically better. A medium room with soft furnishings (bed, couch, curtains, bookshelves) often records voices more cleanly than a bigger, emptier space.
Control the reflections near the mic
With a cardioid microphone, the most important reflections come from behind the singer, because that is where the mic is pointing. The second most important come from the sides and the ceiling close to the capsule.
Options, roughly in order of effect:
- A thick absorber behind the singer. A 10 cm mineral wool panel on a stand, or a heavy blanket hung over a frame, a short distance behind the singer's head.
- Two panels behind and to the sides of the mic, angled in a shallow V. These catch the voice before it reaches the walls and bounces back.
- A panel or blanket overhead if the ceiling is low and hard.
- A rug on hard floors.
Small foam shields that wrap around the back of the mic can help a little, but they do nothing about the reflections behind the singer, which the mic hears most. Thick absorbers behind the performer usually matter more. The guide on practical acoustics for a home studio explains why thin foam does little below 1 kHz.
A quick listening check: record a few spoken sentences, then clap once and listen to the tail of the clap in headphones. A clean, short decay with no metallic ring means the space is under control.
Microphone setup and distance
Which microphone suits your room is covered in the guide on microphones for home recording. Here is how to set either type up.
Large diaphragm condenser:
- Shock mount on a sturdy stand, capsule at mouth height or slightly above, tilted down toward the mouth.
- Distance from lips to capsule around 15 to 25 cm.
- Pop filter 5 to 10 cm in front of the capsule, singer just behind it.
- Polar pattern on cardioid in an untreated or partly treated room.
Dynamic microphone:
- Distance 3 to 8 cm from the lips.
- Aim at the mouth or slightly to one side to reduce plosives.
- A foam windscreen or a pop filter if the singer is close and forceful.
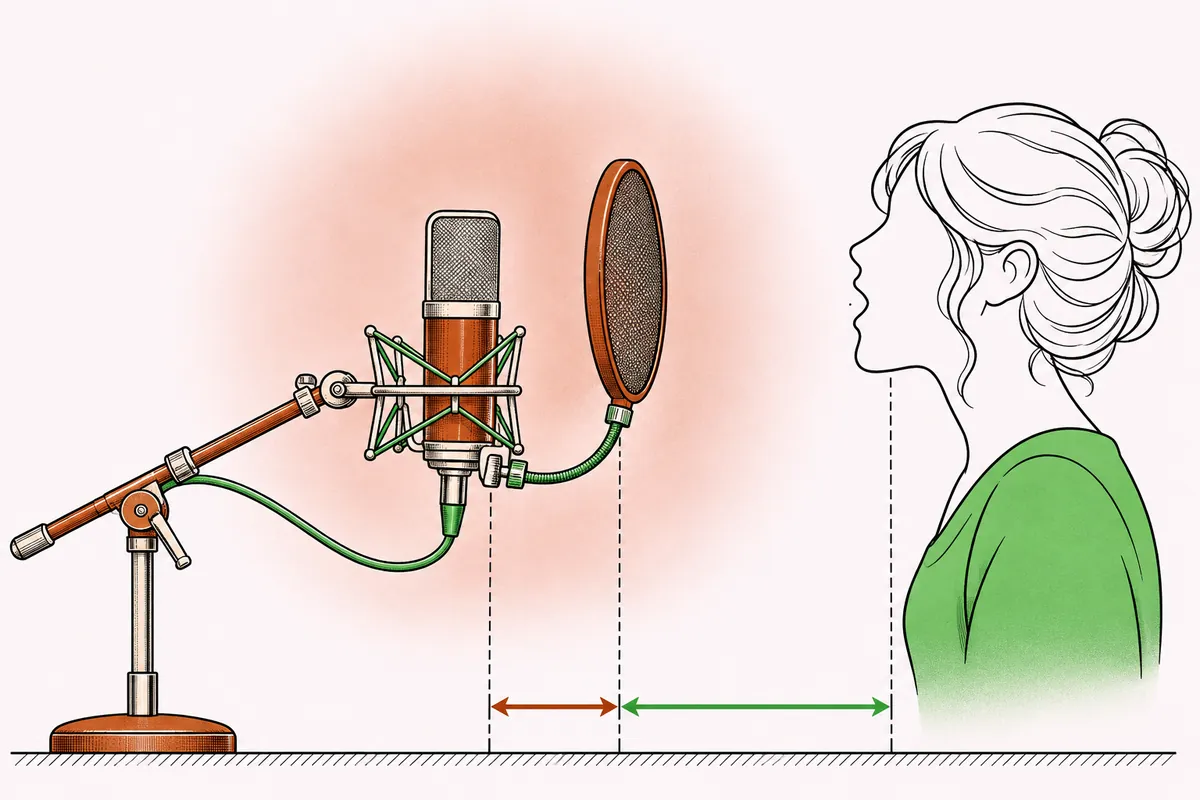
Distance changes the tone through proximity effect: closer means more bass and intimacy, farther means more natural and more room. Once you choose a distance, help the singer keep it. A pop filter at a fixed spot does this naturally, because the singer has a physical reference.
Turn off anything noisy that the mic can hear: fans, air conditioning, a fridge in the next room if possible. Move the computer away from the mic or put the mic's rear (the null of a cardioid) toward it.
The headphone mix
Performance quality often depends more on the headphone mix than on anything else. A singer who cannot hear themselves pushes too hard and goes sharp; one who hears themselves too loudly sings timidly and goes flat.
Starting points:
- Closed-back headphones, so the backing track does not leak into the mic. Open-backs bleed noticeably at normal levels; the guide on studio headphones, open vs closed covers the trade-off.
- Low latency. Use your interface's direct monitoring or a small buffer size (64 or 128 samples) while tracking. Even 10 ms of round-trip delay on your own voice feels odd and hurts timing. The guide on setting the buffer before you track explains the numbers.
- A simple mix: the backing track, a little click or rhythm guide, the voice at a comfortable level.
- A touch of reverb on the voice in the headphones only (not printed to the recording) helps many singers feel at ease and pitch better.
- One ear off is a common preference. Some singers pull one side of the headphones back to hear their natural voice in the room. If they do, pan or mute that side so it does not bleed into the mic.
Ask the singer what they want more or less of before the first take, and again after the first full run.
Recording levels
With 24-bit recording there is no need to record hot. A typical starting target:
- Peaks of the loudest phrases around -10 to -6 dBFS.
- Average levels around -20 to -18 dBFS.
That leaves room for the unexpected loud note without clipping, which in digital is a hard, unusable distortion. Set the gain during the loudest part of the song, not during the first quiet verse. If a song has a whisper intro and a belted chorus, consider two passes with different gain settings rather than squeezing both into one.
Some interfaces and preamps offer a pad or a built-in compressor or limiter. Leave any recording compression off unless you know exactly what you want; it is easier to compress later than to undo it. The guide on gain staging in the DAW follows these levels through the mix.
Warming up and running the session
Singers record better after a short warm-up and with frequent, short breaks. A few practical habits:
- Water at room temperature nearby, away from the mic and electronics.
- Record the first full run even if it is called a rehearsal. First takes often have the most natural energy.
- Aim for focused sessions of 30 to 60 minutes of singing, then a break.
- Write the lyrics out large and place them so the singer does not turn away from the mic to read them. A music stand slightly below the mic works; paper rustles, so a tablet or a large printed sheet fixed to the stand is better.
- Track in sections (verse, chorus, bridge) once the full run is done, so the singer can concentrate on the difficult parts.
Keep the singer's position steady between takes. If they move closer during the chorus, the tone and level change and comping becomes harder.
Takes, playlists and comping
Comping means building the final vocal from the best parts of several takes. Most DAWs offer playlists, take lanes or loop recording that stack each pass under the others, so you can select the best line, word or syllable from each.
A reliable workflow:
- Record three to six full takes of each section, with the same mic position and gain.
- Listen to each line across takes without the backing track loud, and mark the best one. Judge emotion and phrasing first, then pitch, then timing.
- Build the comp by selecting those lines. Keep edits at natural breaks: breaths, consonants like "s" and "t", or the start of a word.
- Add short crossfades (5 to 20 ms) at each edit point to avoid clicks.
- Listen through the whole comp with the backing track. A line that sounded best on its own can clash with the energy of the lines around it.
- Consolidate the comp into a single clip once you are happy, keeping the takes in case you change your mind.
Avoid building a vocal word by word from ten takes unless you need to. Lines that flow from a single performance sound more believable than a perfect but disjointed collage.
Breaths are part of the performance. Lower loud breaths by a few decibels with clip gain instead of deleting them, which tends to sound unnatural.
After the session
Before you mix, clean up the comp: remove noise between phrases, check for clicks at edits and fix any plosives with a high-pass on the clip or a short fade. Label the playlist and save a version with the raw takes.
When you move to the mix, keep in mind that most vocal treatment works better on a well-recorded vocal: a controlled room and steady distance reduce the work for compression, de-essing and EQ. The guide on de-essing vocals helps when bright consonants stand out, and the studio fundamentals section collects the other room and recording topics.
Quick answers
Where is the best place to record vocals in a small room?
Away from walls and corners, not dead center, with something soft behind the singer. An open closet full of clothes behind the microphone position also helps.
How far should a singer be from a condenser microphone?
A starting distance of 15 to 25 cm, with a pop filter 5 to 10 cm in front of the capsule. Move closer for warmth, farther for a more natural sound with a bit more room.
What level should I record vocals at?
Aim for peaks around -10 to -6 dBFS and averages near -18 dBFS in 24-bit. There is no benefit to recording close to 0 dBFS.
How many takes should I record for comping?
Three to six full takes of each section is a reasonable target. More than that tends to tire the singer and makes choosing harder without improving the result.