Studio Monitor Placement in a Home Room: Geometry, Height and Level
By the end of this guide you will be able to place a pair of monitors in a small room, set the listening position, tame desk and wall problems, and calibrate a repeatable mixing level.
By Delia Marchbanks, in Room & Monitoring
Monitors only tell the truth when the room and the geometry around them let them. A pair of good speakers placed in a corner, pushed against a wall and aimed at your chest will mislead you more than a modest pair set up with care. The good news is that most of the gain comes from free decisions: where the desk goes, how far the speakers sit from the wall, how high the tweeters are and how loud you listen.
This guide covers the placement side. The acoustic side (bass traps, reflection panels, room modes) has its own page on practical acoustics for a home studio, and the two work best together. Placement first, treatment second: moving a speaker by 30 cm costs nothing and can change the low end more than a panel does.
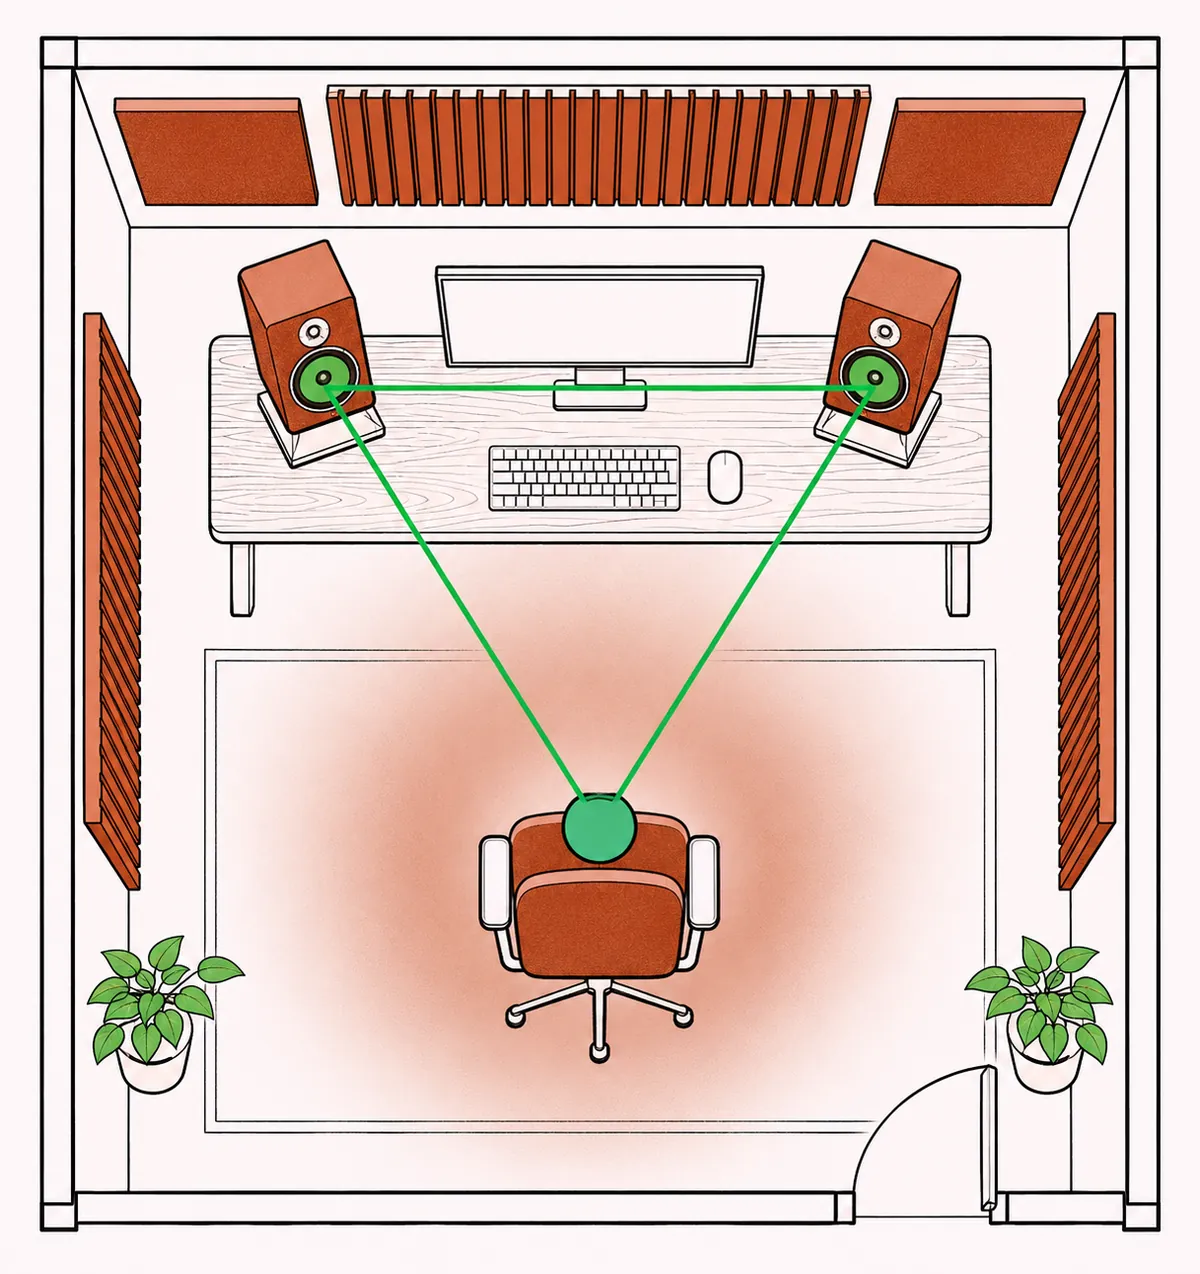
Start with the room orientation
Before touching the speakers, decide which way the room faces. In a rectangular room, set up along the long dimension, facing one of the short walls. That gives the sound more distance to travel before it hits the back wall, and it lets you keep the listening position away from the back half of the room, where bass tends to pile up.
The second rule is symmetry. Center the desk on the width of the room so that the left speaker and the right speaker have the same distance to their side walls. If the left speaker is 40 cm from a wall and the right one is 150 cm from an open doorway, each side reflects and loads the bass differently, and the stereo image leans. You will then pan and balance to correct a room problem, and the mix will sound lopsided everywhere else.
Things that break symmetry and are worth fixing early:
- A window on one side and a bare wall on the other
- A closet door or open hallway beside one speaker
- A bed, couch or bookcase on only one side near the front of the room
- A desk pushed into a corner to save floor space
When perfect symmetry is impossible, aim for symmetry in the front half of the room, around the speakers and your head. The back of the room matters less for the first reflections.
The listening triangle
The classic starting geometry is an equilateral triangle: the distance between the two tweeters equals the distance from each tweeter to the point between your ears. For near-field monitors in a small room, a side of 1.0 to 1.5 meters is typical. Smaller speakers can sit closer; larger ones usually need a bit more distance for the woofer and tweeter to blend.
Then angle each monitor inward so it points at your head, or at a point just behind it. Pointing exactly at the ears gives the most direct high-frequency response. Aiming slightly behind the head widens the sweet spot a little and can soften a bright tweeter. Both are valid; pick one and keep it the same on both sides.
A practical way to set it up:
- Mark the listening position with a piece of tape on the floor where your head will be.
- Use a tape measure or a length of string from that point to each tweeter.
- Adjust until both distances match each other and match the distance between the tweeters, within about 1 cm.
- Sit down and look along the top of each speaker: you should be able to see the side panel of neither speaker, only the front.
Small differences in distance shift the image toward the nearer speaker. A 3 cm mismatch is already about a tenth of a millisecond of timing difference, which is enough to nudge a centered vocal off center at high frequencies.
Tweeter height and vertical aim
The tweeter should sit at ear height when you are in your normal mixing posture. Tweeters are directional, and a speaker's response above a few kilohertz changes as you move off its vertical axis. If the tweeter is at chest height, you hear the speaker from above its axis and the top end often sounds duller than it is, which pushes you to add too much brightness.
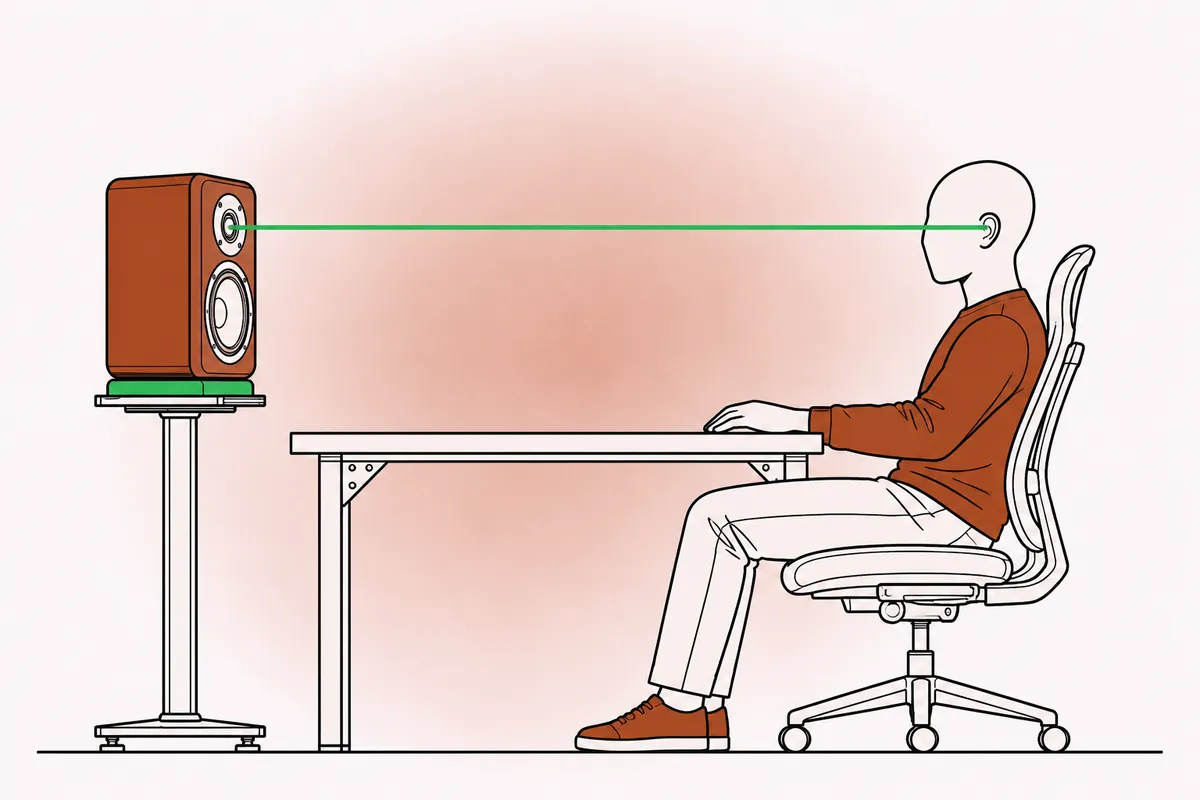
If the monitors must sit lower than ear height, tilt them up so the tweeter axis points at your ears. If they sit higher, for example on a shelf, tilt them down. Most speakers are designed to be used upright with the tweeter above the woofer. Laying them on their side smears the horizontal imaging, because the woofer and tweeter are then side by side and their distances to each ear differ.
Distance from the front wall and SBIR
The front wall is the wall behind the speakers. Sound from the woofer radiates in all directions at low frequencies, so some of it travels backward, reflects off that wall and returns to meet the direct sound. When the reflected path is half a wavelength longer than the direct path, the two cancel. This is speaker boundary interference response, usually shortened to SBIR.
The cancellation frequency depends on the distance from the woofer to the wall. A simple estimate is the speed of sound (about 343 m/s) divided by four times the distance:
| Distance to front wall | First notch around |
|---|---|
| 0.3 m | 285 Hz |
| 0.6 m | 143 Hz |
| 1.0 m | 86 Hz |
| 1.5 m | 57 Hz |
A notch in the 100 to 200 Hz range is particularly annoying because it sits right where kick drums, bass guitars and the body of male vocals live. There are two ways out:
- Close to the wall. Put the speaker within about 20 to 30 cm of the wall, so the notch moves up into a range where the speaker is more directional and less energy goes backward. This raises the overall bass level, which you can trim with the speaker's rear-panel boundary or low-shelf switch.
- Far from the wall. Pull the speaker out past about 1.2 to 1.5 m so the notch falls low enough that it lands near or below the bottom of the speaker's range. In most home rooms this is hard to do without cramping the listening position.
The worst place is usually the middle ground, 50 to 90 cm from the wall, which is exactly where many desks put speakers by default. Absorption behind the speakers reduces the reflection, but at low frequencies it has to be thick to help; a thin foam tile does almost nothing at 120 Hz.
Rear-ported monitors need a little space behind the port, usually 15 cm or more, or the port chuffs and the bass gets boomy. Front-ported and sealed designs are easier to place close to the wall. The guide on choosing studio monitors covers port design in more detail.
The 38 percent rule and the listening position
Room modes create peaks and dips in the bass that vary strongly with where you sit. The worst spot for length-wise modes is the exact middle of the room, where several of them cancel, and the walls themselves, where they all pile up. A long-standing starting point is to place your head at about 38 percent of the room length from the front wall. In a 4.0 m room that is about 1.5 m from the front wall; in a 5.0 m room, about 1.9 m.
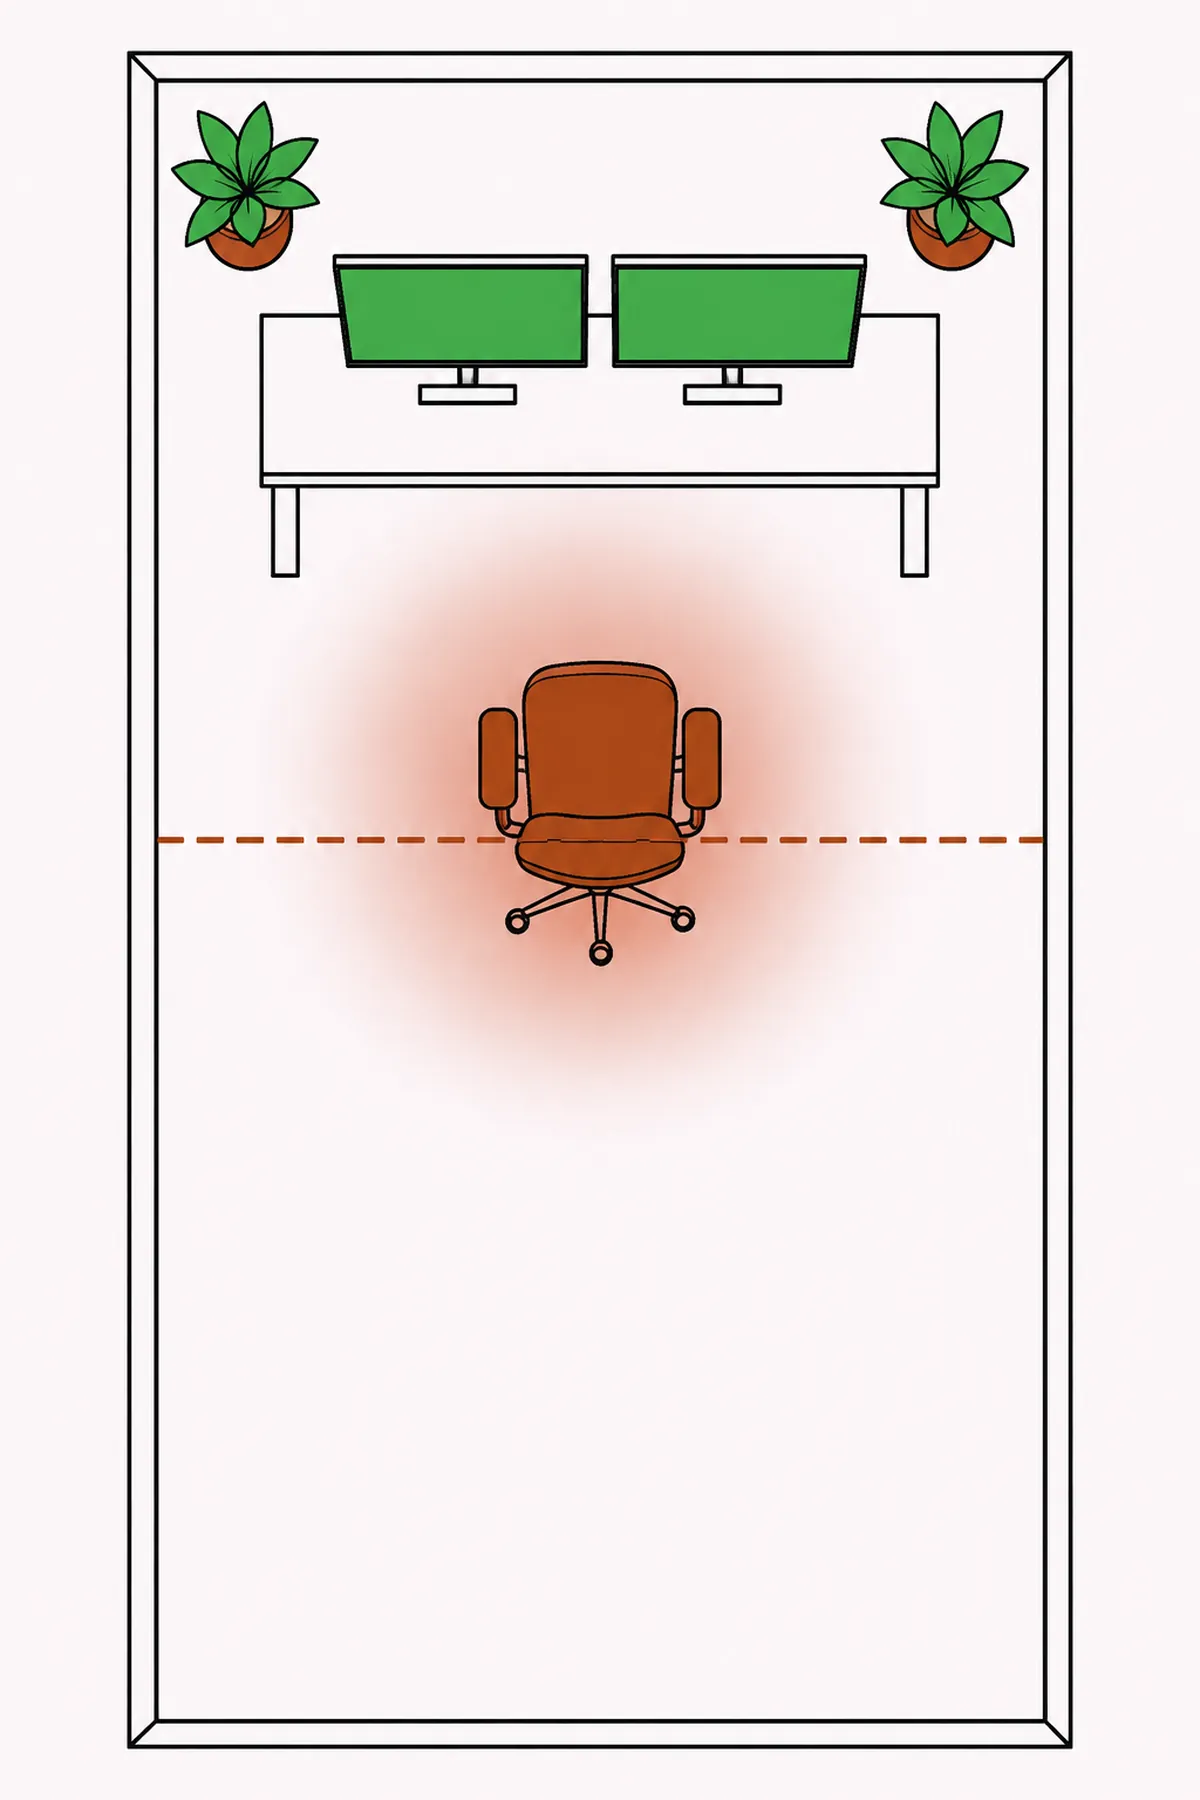
Treat 38 percent as a place to begin, not a law. Real rooms have doors, windows and walls of different stiffness. To refine the spot, play a slow sine sweep or a set of low notes on a bass instrument and move your chair forward and back in 10 cm steps. Pick the position where the notes from about 40 to 150 Hz sound most even. A measurement microphone and a free room analysis app make this faster and give you a graph that reads the same every time, but your ears plus patience will get you most of the way.
Once the head position is fixed, the speakers move with it to keep the triangle.
Desks, consoles and early reflections
The desk is the most common reflection surface in a home studio, and it sits right between the speakers and your ears. Sound from the woofer and tweeter bounces off the desk top and reaches you a fraction of a millisecond after the direct sound, causing comb filtering in the midrange.
Ways to reduce it:
- Put the monitors on stands just behind the desk instead of on top of it, so the desk surface is below the direct line.
- If they stay on the desk, raise them on pads or small stands so the tweeters reach ear height and the speakers sit at the front edge of the desk, not at the back.
- Keep the desk surface between the speakers clear of large flat objects like a laptop screen or an open lid that can reflect toward you.
- A desk with a smaller depth, or one with a slanted top, reflects less energy toward the listening position.
Side walls create the next set of early reflections. Finding and treating those points is covered in the acoustics guide, where the mirror trick shows exactly where panels belong.
Decoupling: pads and stands
A speaker sitting directly on a hollow desk can excite the desk itself, which adds a resonance in the low mids and blurs the bass. Foam or rubber isolation pads, or rigid stands with spikes or rubber feet, reduce how much vibration reaches the furniture. Pads with an adjustable angle also help with tilting the tweeter toward the ears.
Stands that sit on the floor are generally the cleaner option because they move the speaker away from the desk reflection too. Fill hollow metal stands with sand or a dense filler if they ring when tapped, and make sure they are stable; a tall, light stand that wobbles is worse than a low, solid one.
Calibrating listening level
Placement controls what you hear; level controls how you judge it. Human hearing is less sensitive to low and very high frequencies at low volume and becomes flatter as level rises. If you mix loud, the bass seems fuller and you tend to leave it thin; mix very quietly and you add too much. A fixed, moderate level makes decisions repeatable across sessions.
Film mixing rooms work at about 85 dB SPL per channel with pink noise at a reference level. That figure is for large rooms. In a small home room, a range of about 73 to 80 dB SPL is a more comfortable and more useful reference for long sessions, with 79 dB being a common choice.
A simple calibration routine:
- Generate pink noise in your DAW at about -20 dBFS RMS, which is a typical reference for this kind of calibration.
- Play it through one speaker at a time, with any room correction or level switches set the way you will mix.
- Use an SPL meter or a phone meter app set to C weighting and slow response, held at the listening position, pointed at the speaker.
- Raise the monitor controller until each speaker reads your chosen level, for example 76 dB SPL.
- Mark the knob position. That is your reference. Go above it briefly for checks, below it for long stretches, and come back to it for balance decisions.
Phone meters are not precise, but they are consistent, which is what matters for a personal reference. If the left and right speakers read more than 1 dB apart at the same input, check the distances again before blaming the speakers.
Final check from the chair
With everything in place, sit in the mixing position and play a mono source such as a spoken voice or a mono mix. It should appear as a solid point in the center, at about the height of the speakers. If it drifts to one side, check distances and side wall symmetry. If it seems to come from below, raise or tilt the tweeters. If it is vague and spread out, look for strong reflections from the desk or the nearest side walls.
Then play a few well-known references at your calibrated level and listen for low end consistency as you lean forward and back slightly. A room where the bass changes dramatically with a 20 cm move needs acoustic treatment in the corners more than any other change. For checks beyond the speakers, including a second opinion on low end, keep a pair of headphones on hand and read about mixing on headphones. A structured self-review checklist for your mixes helps turn the new setup into better decisions. More room and monitoring topics are collected in the studio fundamentals section.
Quick answers
How far apart should near-field monitors be?
For most small rooms, 1.0 to 1.5 meters between tweeters, with the listening position at the same distance from each tweeter. That forms an equilateral triangle and gives a stable center image.
Should monitors face straight ahead or toward me?
Angle them inward so the tweeters point at your ears or just behind your head. Straight-ahead speakers lose high frequency detail at the listening position and the center image weakens.
Is it bad to put monitors against the wall?
Close to the wall is often better than 50 to 90 cm away, because it moves the cancellation notch out of the bass range. Trim the extra bass with the speaker's boundary switch and leave space for a rear port.
What level should I mix at in a small room?
A calibrated reference around 73 to 80 dB SPL per speaker with pink noise suits most home rooms. Use it for balance decisions and spend long stretches a little quieter to protect your ears.