Microphones for Home Recording: Types, Patterns and Placement
After this guide you will know how each microphone type behaves, which one suits your room and sources, and where to place it for voice and guitar as a first, adjustable position.
By Delia Marchbanks, in Room & Monitoring
A microphone turns air pressure into voltage, and the way it does that shapes everything downstream: how much room it hears, how it reacts to loud sources, how much gain the interface needs and how the voice changes as the singer moves. Picking a mic for a home studio is less about finding the "best" one and more about matching the type to your room, your sources and your interface.
This guide explains the three main families, polar patterns, proximity effect and phantom power, then gives placement starting points for voice and acoustic guitar.
Dynamic microphones
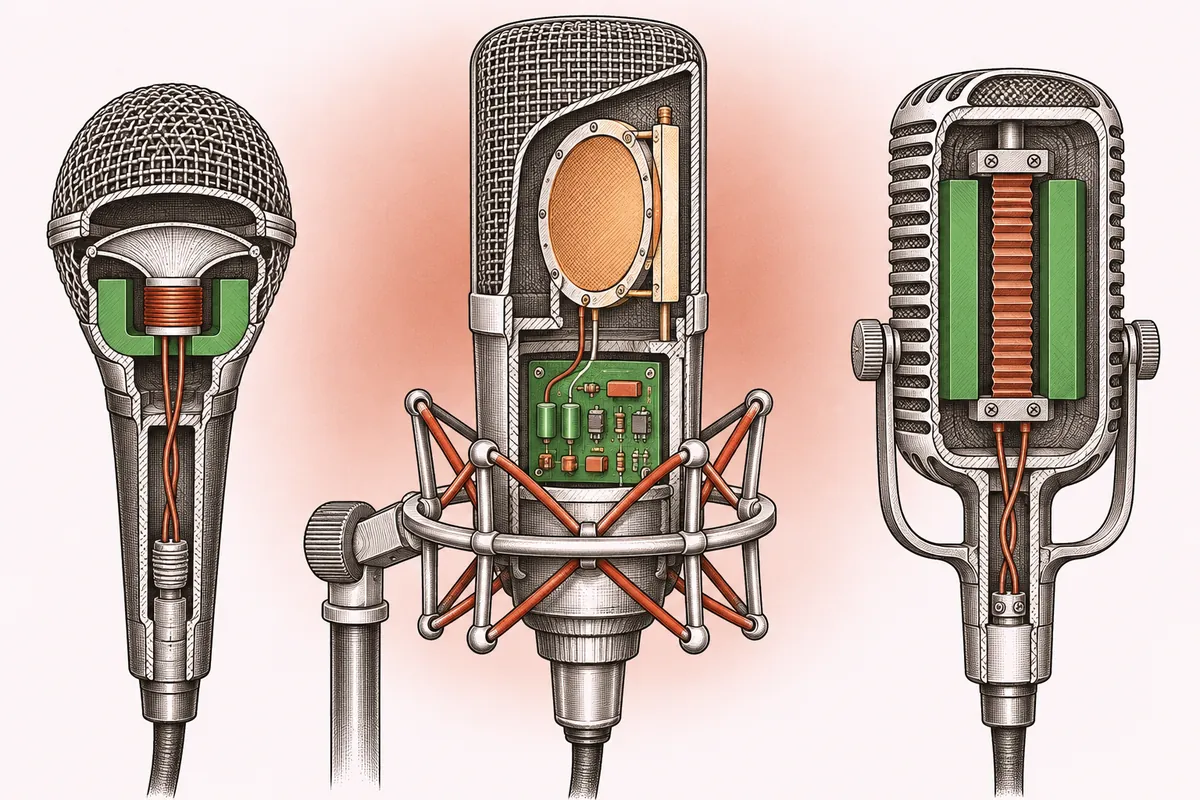
A dynamic microphone uses a diaphragm attached to a coil of wire that moves inside a magnetic field. The motion generates a small voltage directly, with no power needed. Because the diaphragm and coil have some mass, dynamics respond a little less quickly to very fast transients and often roll off gently in the top octave.
What that means for a home studio:
- Lower sensitivity. They pick up less of the room at a given distance, because you work them close and the output is modest. In an untreated room this is a real advantage.
- High loudness handling. Guitar cabinets, snare drums and loud singers rarely overload them.
- Gain hungry. Many dynamic vocal mics need 55 to 65 dB of preamp gain for a normal spoken voice at a few centimeters. Some budget interfaces run out of clean gain before that, which is why a 60 dB+ preamp matters if you plan to work with dynamics; see the guide on choosing an audio interface.
- Durable. Drops, humidity and temperature changes bother them far less than other types.
Broadcast-style dynamics with a large diaphragm and built-in shock mount are common for spoken word and some vocal styles. Classic handheld stage dynamics work very well on guitar amps and snare.
Condenser microphones
A condenser uses a very thin, conductive diaphragm placed close to a fixed backplate. Together they form a capacitor; as sound moves the diaphragm, the capacitance changes and a small built-in amplifier converts that into a signal. The light diaphragm reacts quickly and extends well into the high frequencies.
Condensers come in two main forms:
- Large diaphragm condensers (LDC), with capsules around 25 mm (1 inch) across, usually side-address (you sing into the side, not the top). They are the default image of a vocal mic. They are sensitive, detailed and often have a slight presence lift somewhere between 3 and 10 kHz.
- Small diaphragm condensers (SDC), with capsules around 12 to 20 mm, end-address (pointed at the source like a pen). They have more consistent off-axis response, which makes them popular for acoustic guitar, overheads, piano and stereo pairs.
Condensers need power for their internal electronics, usually phantom power (described below). Their high sensitivity means they also hear more of the room: reflections from bare walls, computer fans, traffic and the hum of a fridge in the next room. In an untreated bedroom, a condenser can make a recording sound roomy and boxy where a dynamic would sound close and dry.
Ribbon microphones
A ribbon microphone suspends a very thin strip of corrugated aluminum between strong magnets. The ribbon moves with the air itself, producing a natural, smooth top end and a figure-8 pattern by design.
Ribbons tend to sound darker and softer than condensers, which flatters bright sources such as harsh guitar amps, brass and cymbals. They have practical caveats:
- Many passive ribbons have low output and need lots of clean gain, often more than a typical dynamic.
- Strong blasts of air (kick drum ports, plosives, wind) can stretch the ribbon. Use a pop filter and avoid placing them in a direct air stream.
- Older passive ribbons can be damaged by miswired cables when phantom power is on, so it is safest to switch phantom off before connecting them. Active ribbons with built-in electronics need phantom power; check the documentation.
For a first home setup, a ribbon is usually a second or third microphone rather than the first.
Polar patterns
The polar pattern shows how sensitive the mic is to sound arriving from different angles.
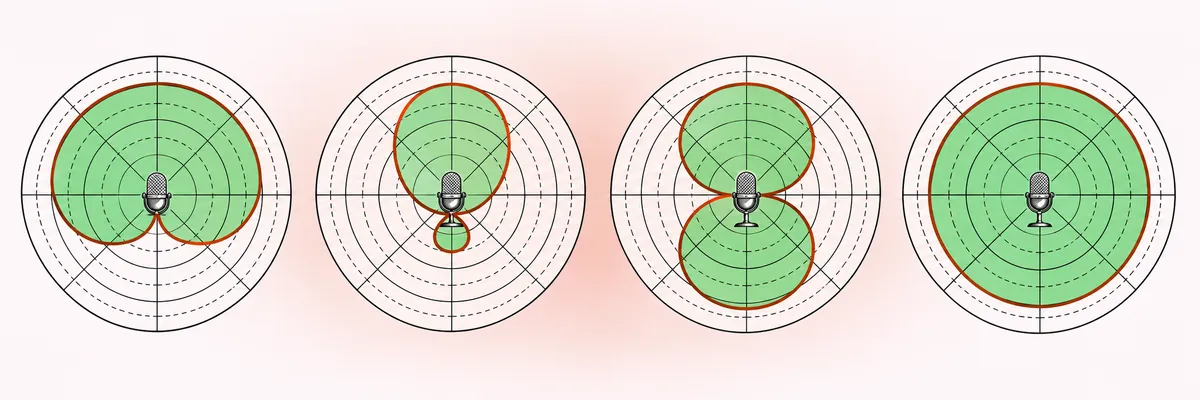
| Pattern | Picks up | Home studio use |
|---|---|---|
| Cardioid | Front, rejects rear | Vocals, most sources |
| Supercardioid | Narrower front, small rear lobe | Loud rooms, stage |
| Figure-8 | Front and rear, rejects sides | Ribbons, mid-side, duets |
| Omni | All directions | Treated rooms, natural ambience |
Cardioid is the default for good reason: it hears what you point it at and rejects the back, where you can put the noisiest part of the room. Aim the dead side (the rear for cardioid, the sides for figure-8) at the computer, the window or the reflective wall.
Omni mics have no proximity effect and a very natural sound, but they hear the whole room equally. They shine in a well-treated space and struggle in a bare one. Many large diaphragm condensers offer switchable patterns; in an untreated room, stay on cardioid.
Proximity effect
Directional microphones (cardioid, supercardioid, figure-8) boost the low frequencies as the source gets closer. At 2 to 5 cm, a voice can gain 10 dB or more below about 200 Hz compared with the same voice at 30 cm. Radio voices use this on purpose for a warm, close sound.
The effect is a tool and a hazard:
- Move closer for warmth, farther away for a more natural, lighter tone.
- If the singer moves back and forth, the low end changes from word to word, which compression cannot fully fix. Mark a distance and ask the performer to keep it.
- Many mics have a low-cut switch, often around 75 to 100 Hz, to reduce rumble and some of the proximity buildup. Use it with care, since a high-pass in the DAW can always be adjusted later and a switch cannot.
Omni microphones have essentially no proximity effect, which is one reason they are chosen for natural recordings at a distance.
Phantom power and connections
Most studio microphones connect with XLR cables. Phantom power, usually 48 volts, is sent by the interface or preamp down the same cable to power condensers and active ribbons. It is switched on per channel or for a group of channels on most interfaces.
Points to remember:
- Dynamic mics ignore phantom power when wired correctly; it does them no harm.
- Turn phantom power on or off with the channel muted or the monitors turned down, to avoid a loud pop.
- Some USB microphones contain their own preamp and converter, so they skip the interface entirely. They are convenient for spoken word and simple setups but limit you to one mic per computer in most cases.
Matching the mic to the room
This is the decision that matters most at home. An untreated room with parallel hard walls favors a dynamic, worked close, in cardioid. You get more direct voice and less room, which is easier to make sound professional than a distant, reverberant condenser recording.
A partially treated room, or a vocal booth made with absorbers around the mic position, opens the door to a large diaphragm condenser at 15 to 25 cm. The added detail and air become an advantage once the room behind and beside the singer is controlled. The guide on practical acoustics for a home studio explains how thick those panels need to be.
A useful listening check: record the same line with each available mic, at the distances given below, then listen on headphones. If the condenser version sounds hollow or boxy compared with the dynamic, the room is not ready for it yet.
Placement starting points for voice
These are first positions to adjust by ear, not fixed rules.
- Dynamic, spoken word or singing: 3 to 8 cm from the lips, slightly off axis (aimed at the corner of the mouth) to reduce plosives.
- Large diaphragm condenser, singing: 15 to 25 cm, pop filter about 5 to 10 cm in front of the capsule, capsule at mouth height or slightly above and aimed down at the mouth.
- Loud passages: have the singer lean back a few centimeters, or set the level so peaks reach around -10 to -6 dBFS with average levels lower.
The vocal recording guide covers the rest of the process: reflection control behind the singer, the headphone mix and comping. Read it at recording vocals at home.
Placement starting points for acoustic guitar
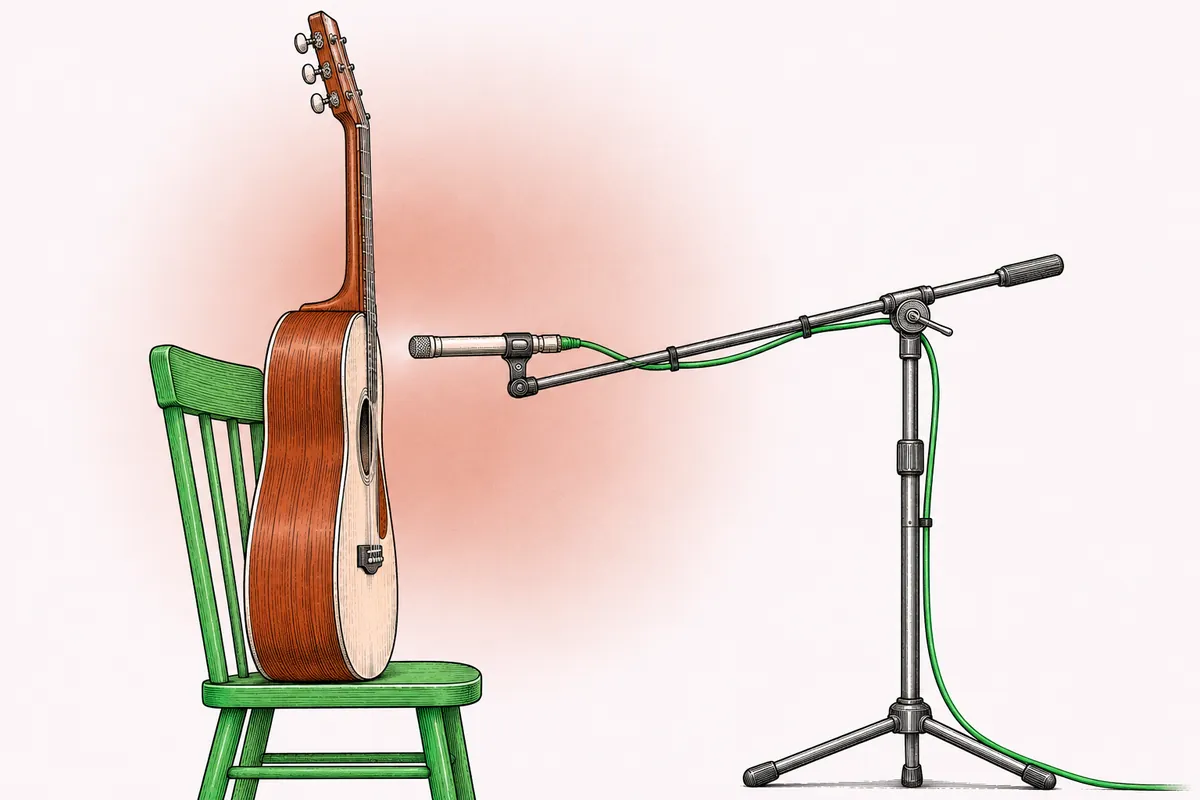
- One small diaphragm condenser: 15 to 30 cm from the strings, aimed where the neck meets the body (around the 12th to 14th fret). This gives a balanced tone with less boom than aiming at the sound hole.
- Toward the sound hole: more bass and boom; useful for a thin-sounding instrument, but often too much in a small room.
- Toward the bridge: more pick attack and a woodier tone.
- Two mics: a second mic near the body behind the bridge, or a stereo XY pair at the 12th fret, gives width. Check the pair in mono for phase cancellation.
The same dynamic versus condenser trade-off applies: a dynamic close to the guitar gives a tighter, less detailed sound that can still sit well in a dense mix.
Gain and levels
Set the preamp gain so that the loudest parts of the performance peak around -10 to -6 dBFS, leaving room for surprises. In 24-bit recording, there is no benefit to recording close to 0 dBFS; the noise floor of the converter is far below the noise of any home room. The guide on gain staging in the DAW follows the signal from preamp to mix bus.
For headphone monitoring while tracking, closed-back headphones keep the click and backing track out of the microphone; see open, closed and semi-open studio headphones.
Quick answers
Dynamic or condenser for vocals in an untreated room?
A dynamic, worked close in cardioid, is usually the safer choice. It hears less of the room, and a close, dry vocal is easier to mix than a distant, roomy one.
Does a dynamic microphone need phantom power?
No. Dynamic mics generate their own signal and ignore phantom power. Condensers and active ribbons need it.
Why does my voice sound boomy on a close microphone?
That is proximity effect: directional mics boost the bass as the source gets closer. Back off a few centimeters, angle the mic slightly or use a gentle high-pass filter around 80 to 100 Hz.
How much preamp gain does a dynamic mic need?
Often 55 to 65 dB for a normal speaking voice. Check that your interface provides that much clean gain before relying on a low-output dynamic.