MIDI Drums vs Audio Drum Samples: How to Choose and Combine Them
After reading, you will know when programmed MIDI drums serve a song better than audio samples, how to make either one sound played, and when to commit a part to audio for the mix.
By Delia Marchbanks, in Computer & Interface
Drums in a home production arrive in two forms. Either you program notes that trigger a sampled kit inside a virtual instrument, or you work with audio files of drum hits and loops placed directly on the timeline. Both end up as sound, but they behave very differently while you write, edit and mix.
The choice is less about realism than about control and timing: how long you want the part to stay editable, and how much processing power the session can spare.
What each approach actually is
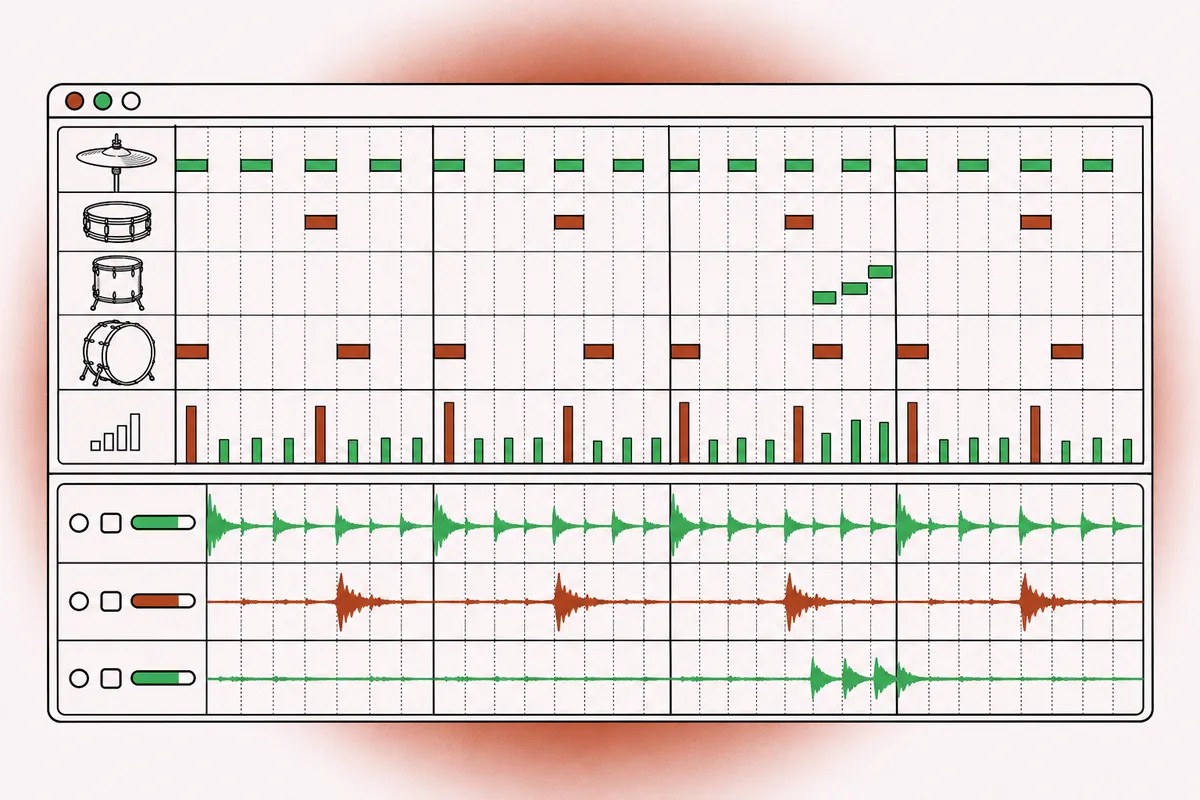
A MIDI drum part is a list of instructions: which drum, when, and how hard. The sound comes from a drum instrument plugin that holds thousands of recorded hits and picks one for each note. Change the kit, the tuning or the mic balance inside the instrument and the whole part follows.
An audio drum part is sound already printed. That can be one-shot samples (a single kick hit, a single snare hit) placed on a grid or triggered by a simple sampler, or loops and full performances recorded by a drummer. What you hear is fixed; you edit by cutting, moving and processing the audio.
Between the two sits the sampler loaded with your own one-shots and played from MIDI. It gives MIDI editing with sounds you chose, without a full kit instrument.
How sampled kits get close to a real drummer
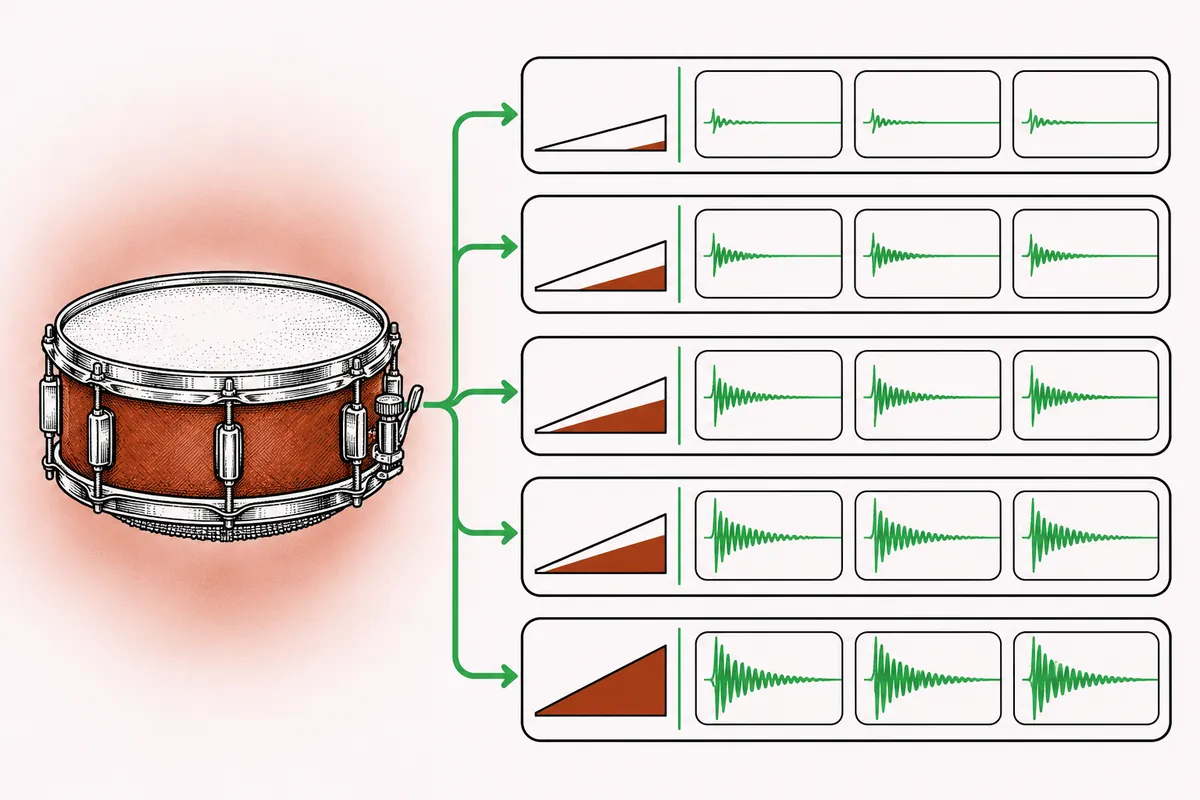
A real drummer never hits a snare the same way twice. Sampled instruments imitate that with two mechanisms.
Velocity layers
MIDI velocity runs from 1 to 127. A good kit instrument records each drum at many strengths and splits the velocity range into layers, often eight to twenty or more on a snare. Soft notes trigger soft recordings, which are darker and shorter, not only quieter. A hard hit has more attack and more ring. This tonal change is what makes ghost notes sound like ghost notes rather than a loud hit turned down.
Round robin
Within each layer, the instrument rotates between several recordings of the same strength, often three to eight. Repeated sixteenth notes on a hi-hat therefore never trigger the same file twice in a row, which avoids the mechanical "machine gun" effect of fast repeated one-shots.
With plain audio one-shots, neither mechanism exists unless you build it. A single snare sample repeated on every backbeat is perfectly consistent, which suits many electronic styles and sounds wrong in a song that pretends to be played live.
Editing flexibility
MIDI wins as long as the song is still changing.
- Arrangement changes. Copy a chorus, shorten a bridge, add a fill: notes move without artifacts.
- Tempo changes. A MIDI part follows the tempo map perfectly. Audio has to be warped, and stretching drums by more than a few percent can soften transients.
- Sound changes. Swap the snare for a brighter one in the whole song with one click.
- Per-hit fixes. Move one late kick by a few milliseconds or lower one hi-hat velocity without touching anything else.
Audio has its own strengths. A recorded loop or a live performance carries feel, cymbal wash and room sound that are hard to program. Editing audio drums is also very direct: a slice with a short fade is predictable, and what you see is what plays. Multitrack drum recordings can be edited across all tracks at once, as long as edits stay grouped so phase between mics is preserved.
Making programmed drums feel played
Straight programming on a grid at constant velocity sounds stiff. A few moves fix most of it.
- Vary velocity with intent. Accent the backbeat, keep hi-hats softer on the offbeats, make ghost notes truly quiet (velocity 20 to 45). A typical eighth-note hat pattern might alternate around 95 and 70.
- Use partial quantize. Quantizing at 50 to 80 percent strength keeps some of a played feel while tightening the worst notes.
- Shift instruments slightly. Pushing the snare 5 to 10 ms late gives a relaxed backbeat; pulling hi-hats a few milliseconds early adds urgency. Small offsets, consistent within a section.
- Add swing deliberately. A swing value of 54 to 60 percent on sixteenths gives most grooves a lift without sounding like a shuffle.
- Respect the drummer's limbs. A human has two hands and two feet. A crash, a ride and a hi-hat on the same beat with a snare hit cannot all be played. Impossible parts sound wrong even to listeners who cannot say why.
- Program fills by phrase. Fills tend to crescendo into the downbeat, so velocities rise across the fill.
Random humanize functions help a little, but random variation is not musical variation. Shaping velocity by hand on the key parts beats any randomizer.
CPU, memory and session weight
Large drum instruments stream samples from disk and hold part of each file in RAM. A detailed kit with many mic positions can load several gigabytes and load slowly. During playback the CPU cost is usually moderate, but heavy internal effects, room mics and bleed simulation add up.
Audio drum tracks cost almost nothing to play back. That is why many producers program in MIDI and then print to audio once the part is settled. If the session crackles at a buffer you need for tracking, freezing or bouncing the drum instrument is the first fix; the buffer size guide explains the tradeoff.
When to commit MIDI drums to audio
Committing means rendering the drum instrument to audio tracks, ideally one per drum or per mic group (kick, snare, toms, overheads, room). Good moments to do it:
- the arrangement is final and the tempo map will not change;
- you are moving to the mix stage and want to treat drums like recorded tracks;
- you are handing the session to someone who does not have the same instrument;
- you are archiving a project for the long term.
Keep the MIDI on a muted, hidden track. If a change comes later, you can render again. Commit with the instrument's own effects bypassed if you prefer to do compression and EQ in the mixer, and leave a few decibels of headroom: peaks around -10 to -6 dBFS on each multitrack give room for processing. The gain staging guide covers those levels in more detail.
Replacing and blending
Drum replacement takes a recorded drum track, detects each hit, and triggers a sample at the same moment. It is useful when a kick was recorded poorly or when bleed makes a snare track hard to control.
Replace or blend?
Full replacement gives total consistency and loses the original performance dynamics unless velocity is mapped from the detected level. Blending keeps the recorded track and adds a sample underneath, often 6 to 12 dB lower, to reinforce weight or attack. Blending usually sounds more natural.
Getting the triggering right
- Set the detection threshold so every real hit triggers and bleed does not. Check the quietest ghost notes and the loudest flams.
- Map hit level to velocity, so a soft hit triggers a soft sample layer.
- Check timing and phase. A sample triggered a millisecond off the original will comb filter against it. Zoom in, align the first transient, then flip polarity on one of them and listen for the version with more low end; that is the correct polarity.
- Choose samples that fit the recorded kit in pitch and decay. A long, tuned-down snare sample under a tight, high snare sounds like two drums.
Layering works with programmed kicks too. A short click layer plus a longer sub layer is a common approach in electronic music. The kick drum mixing guide shows how to keep the layers in phase and split their frequency roles.
Choosing for your project
| Situation | Good fit | Why |
|---|---|---|
| Songwriting, arrangement still open | MIDI kit | Every change is free |
| Electronic, grid-tight style | Audio one-shots in a sampler | Consistent, punchy, light |
| Organic feel, no drummer | MIDI kit, humanized | Velocity layers and round robin |
| Loop-based production | Audio loops | Feel and room come built in |
| Recorded kit with weak tracks | Blend samples | Keeps the performance |
Most productions end up mixed: a MIDI kit for the main groove, audio loops for texture or percussion, and a sample layer under the kick. What matters is knowing which parts are still editable and which are printed. If you are new to the vocabulary used here, the production glossary defines velocity, round robin and the rest.
Quick answers
Do audio drum samples sound more real than MIDI drums?
Not by themselves. A single one-shot repeated without variation sounds more mechanical than a good sampled kit with velocity layers and round robin. Recorded loops and live performances sound the most human because a drummer played them.
Should MIDI drums be quantized at 100 percent?
For grid-based electronic styles, often yes. For styles that imitate a live drummer, 50 to 80 percent strength plus deliberate velocity work usually feels better.
Is it safe to delete the MIDI after printing drums to audio?
Keep it muted and hidden in the session. It costs nothing and lets you render again if the arrangement or the kit sound changes.
Why does a blended snare sample sound thin?
Usually a timing or polarity mismatch with the original track. Align the transients precisely and compare both polarity settings; the fuller one is correct.